
Before you begin
This guide is for Slate Captains and CRM operators using Loper’s Slate Suitcase to install the source formats and prompt mappings required for Loper behavioral data.
You need:
- administrator access to your institution’s Slate instance;
- the current Loper-provided Suitcase ID; and
- representative sample data files from Loper for validation and mapping.
If you do not have the Suitcase ID or sample files, contact your Loper account manager. Before activating delivery, schedule a CRM setup meeting with Loper so the team can authenticate delivery to your SFTP destination.
1. Import the Suitcase
- In your production Slate instance, go to Database, search for Suitcase Import, and open it.
- Paste the Suitcase ID supplied by Loper and choose Import.
- Wait for Slate to display the suitcase contents, then review every tab before completing the import.
Slate’s Suitcase Import documentation explains the native import workflow.
Items tab
Review the source formats, tabs, forms, and queries. You may rename incoming items or modify their destination folder, format, or user. Choose the action for each item deliberately:
- Create New when no matching item exists.
- Save as New Copy to preserve an existing item and add a separate copy.
- Merge with Existing to update a matching item. This is usually the best option when upgrading an older Loper suitcase.
- Replace Existing only when you intend to remove the existing item and replace it with the suitcase version.
Fields tab
For each incoming field, choose whether to import it, keep references to an exact existing field, clean all references, or remap the suitcase items to a different existing field. Do not create a duplicate field merely because the default is Import new Custom Field.
Prompts tab
The default is Do not import. Choose Import new prompts, Merge with existing prompts, or map to an existing prompt key as appropriate.
The following prompt keys contain institution-specific placeholder values and must be updated after import using the custom prompts spreadsheet supplied by Loper:
loper_wizquiz_badgeloper_dayinthelife_badgeloper_factorfiction_badgeloper_campaign_tagsloper_campaign_clicks
Rules of thumb
| Situation | Items | Fields | Prompts |
|---|---|---|---|
| First Loper setup | Create New | Import new Custom Field | Import new prompts |
| Upgrading an older Loper suitcase | Merge with Existing | Keep existing references; import only new fields | Merge existing prompts; import only new keys |
| Existing custom formats and fields | Review whether standardized copies should replace local items | Remap to the institution’s existing fields | Remap to the institution’s existing prompt keys |
When the selections are correct, choose Import.
2. Refresh Slate caches
- Go to Database → Fields and force-refresh the fields cache.
- Go to Database → Prompts. Replace the placeholder values under each Loper prompt key with the values in your Loper custom prompts spreadsheet.
- Force-refresh the prompts cache.
- Go to Database → Refresh Configurable Joins Library so exports, filters, and joins include the new items.
3. Configure and test every source format
Repeat this process for each Loper source format. Configure in production, validate through a refreshed test environment, and activate production remapping only after the test import is correct.
Activate the source format shell
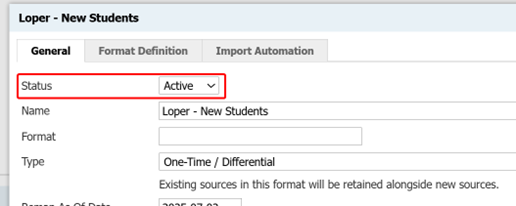
Open Database → Source Formats, select the Loper source format, choose Edit, and set Status to Active. Leave Remap Active set to Inactive at this stage.
Check mappings
- Upload a representative Loper sample file to the active source format.
- Wait 10–15 minutes for processing, or use Force Process Import in Database.
- Choose Edit Mappings on the source format.
- Review field mappings, prompt-value mappings, and static mappings. Add or edit mappings where your institution’s schema differs.
Test before production activation
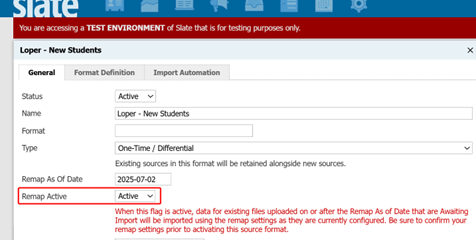
Refresh the Slate test environment, set Remap Active to Active there, run the sample import, and inspect all created and updated records. Make mapping changes in production, refresh test again, and repeat until the result is correct.
Activate production mappings
After the production source format is mapped and the test import is validated, enable Remap Active in production. Data will then begin flowing automatically.
Support
For the Suitcase ID, sample files, SFTP setup, or mapping questions, schedule a CRM setup meeting or email [email protected].